
How to Organize Your Inbox with Folders and Categories
August 11, 2024

Are you tired of searching for important emails from your cluttered inbox for endless hours? The constant influx of messages overwhelms you and you find it difficult to get the desired message in time. But you want to be more productive and decrease your stress level. Don’t worry. You are in the right place. Today in this tutorial, I will introduce a very simple solution and guide you step by step through the whole process. The solution comes with a fantastic feature of Microsoft Outlook: creating folders and organizing the massive number of emails in your inbox in categories. To Organize Your Inbox with Folders and Categories go through the content below:
Let’s kick things off now.
What are Folders and Categories in MS Outlook?
These are two essential tools that help users to organize and manage their incoming emails effectively. The folders in MS Outlook are like a physical filing system. It allows you to group and store important emails and other calendar events or tasks separately. It is like a container, where you will be able to keep your special and desired emails with different names. For example, you might have different folders of emails for different projects and different clients. You can also categorize the folders into invoices, meetings, or personal basis. Besides, you can have some subfolders inside another folder. That means the system works like a hierarchical organization. The most powerful and unique aspect of MS Outlook folders is that you can even set up some rules to automatically sort out incoming emails based on different criteria like subject, keywords, or sender names.
How to create folders in MS Outlook?
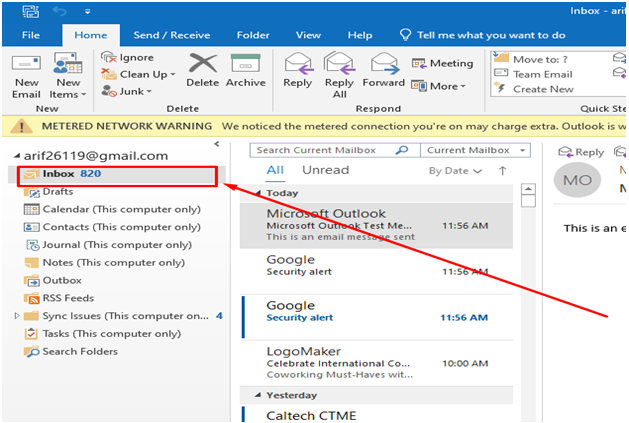
- First of all, open your Microsoft Outlook. Then go to the inbox.
- After that, right-click on the word “Inbox”.
- It will show you a new window on your screen like below. Then click on New Folder.
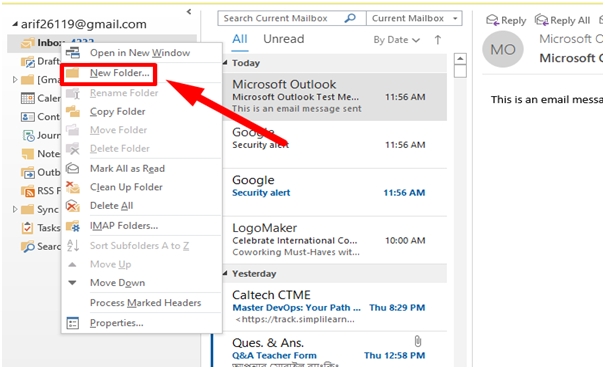
- After that, you have to name your new folder. For Example, I named my new folder “sender 1’. You can name as you demand and wish.

- Now click on the Ok button to complete creating the folder in your inbox.
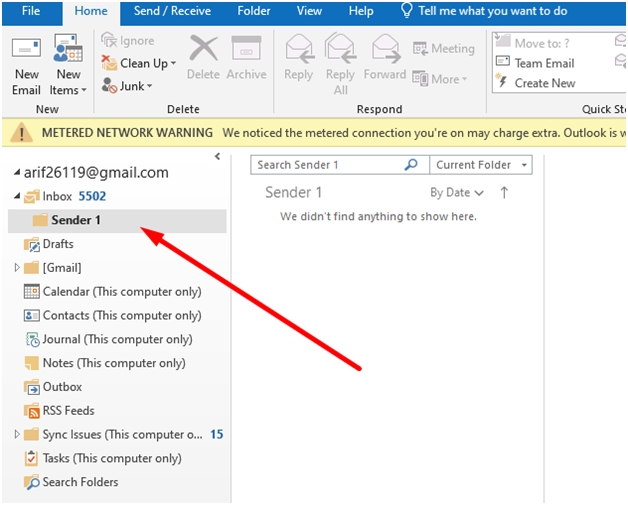
- You will be able to see the new folder as a sub-folder under the inbox.
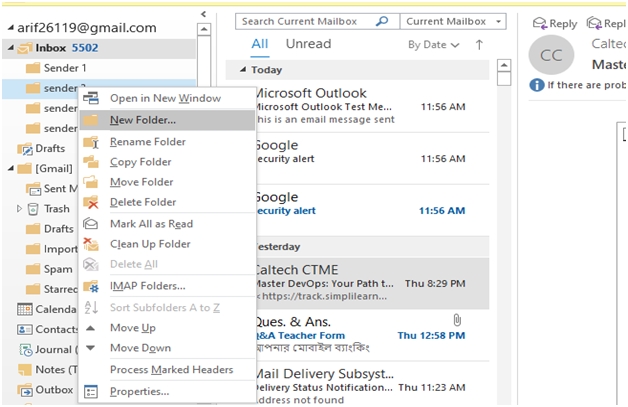
How to organize and create subfolders under another folder?
- Now after creating multiple folders, you can easily drag and drop to rearrange the folders as you wish.
- Besides you can also create sub-folders by right-clicking on an existing folder and naming it according to your demands.
How to move emails to a separate folder?
Now this time, you might be thinking that I have created the folder anyway. But how can I store the emails and set rules to automatically keep the particular emails in this folder? So, let’s. look into this matter now.
- Go to your inbox and select the emails that you want to store separately by right-clicking on them.
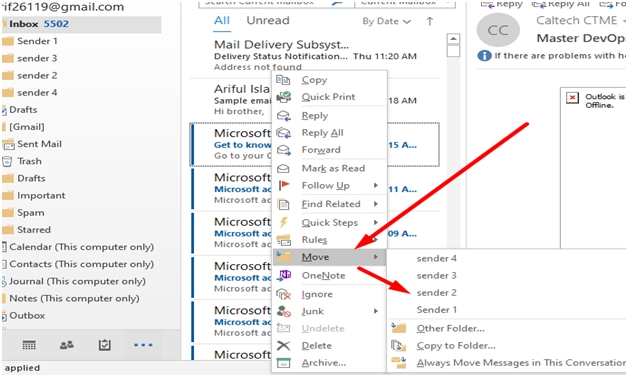
- After that, you have to scroll down to the ‘Move’ option and then select your desired folder to keep your emails.
How to set rules for the E-mails?
Now if you want to set particular rules to store them automatically whenever any new mail comes to you from a specific sender, follow the steps below.
- Just right-click on any emails upon which you want to set rules.

- Now you will see a new window like this. From that menu, click on “Rules”.
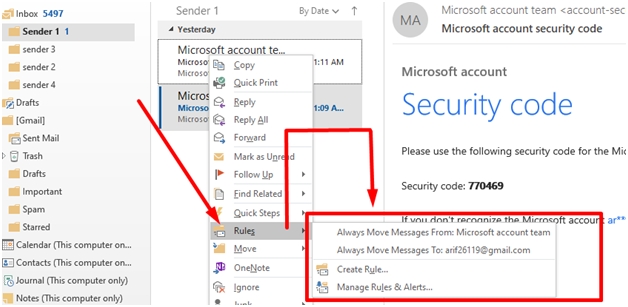
- Now you can select “Always Move messages from ___ account team”. If you select this one, then all the new emails will be automatically moved to this folder. You will not need to store them one by one again.
- But in some cases, you can also create a new rule. If you select “Create Rules”. You will be directed to this window.
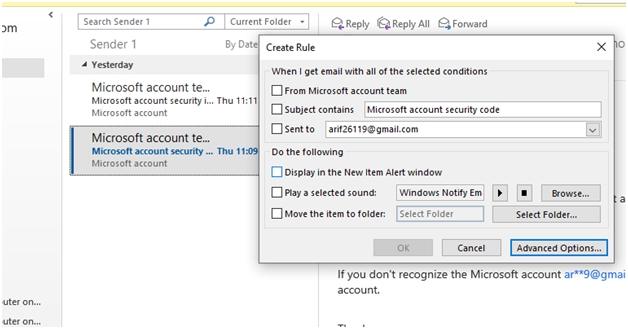
- From here, you can set new rules as you wish. Besides, there are some advanced options for you. From the advanced menu, you can do anything. There are hundreds of options to suit your specific demands. MS Outlook team named this Menubar as Rules Wizard. Now you have to explore a little bit to completely understand the magical Rules Wizard.
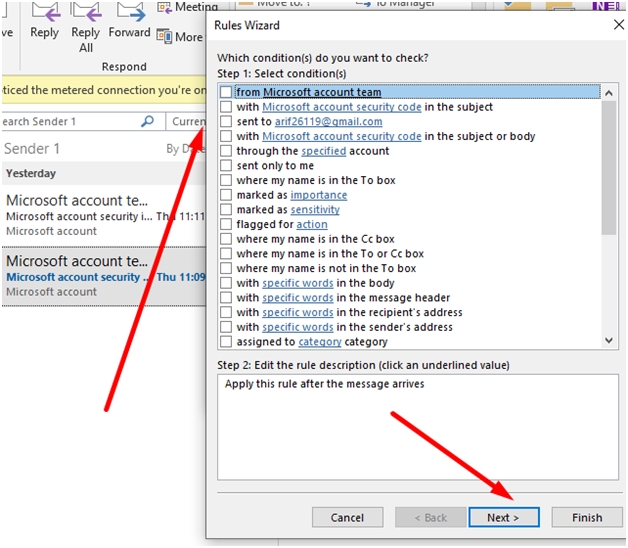
- After selecting the rules, you just have to click on next and next to complete the Finish.
In this way, you can easily create folders and store emails and even set some rules to meet your specific demands. Isn’t it cool enough?
How to set categories to particular emails?
To arrange the emails more dynamically, here comes with categorizing your emails with different color codes to identify them easily. In this way, you can arrange the inbox emails more effectively. In the created folders, now you can categorize the emails to identify them later on with ease and peace. To set categories to particular emails, follow the steps below.
- In the advanced options, under the menu ‘Set Rules’ you will see an “assign to Category” option like below.
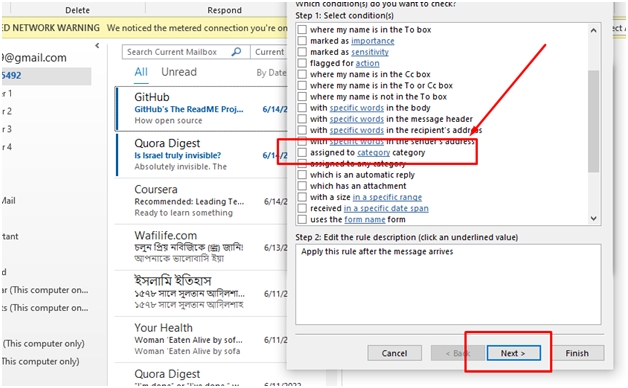
- Now click on the “category” and mark a tick on it. After that again click on “category” below step 2. Then a new window will be shown on your screen like below.
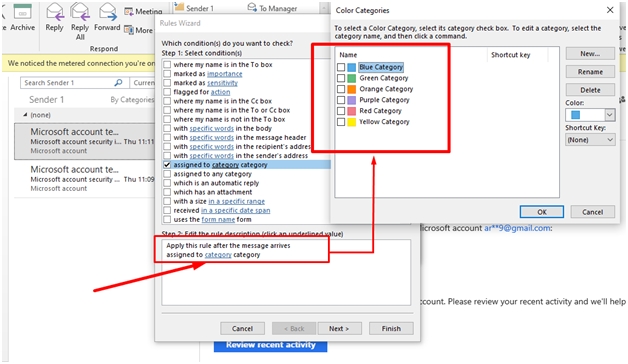
- Now, you can easily choose any category based on your priority and select them with multiple color names.
Congratulations! You are done! If you have followed the mentioned steps one by one, then you have just created folders and set categories to your cluttered emails to identify them very easily.
How to delete a created folder from your Inbox in MS Outlook?
Now if you want to no longer use a particular folder to separately store your emails, you can easily delete the folder. Just follow the steps shown below.
- Just right-click on the folder that you want to delete. For example: I want to delete the folder with the name “sender 2”. After I right-click on it, immediately a new pop-up window appears on the screen.
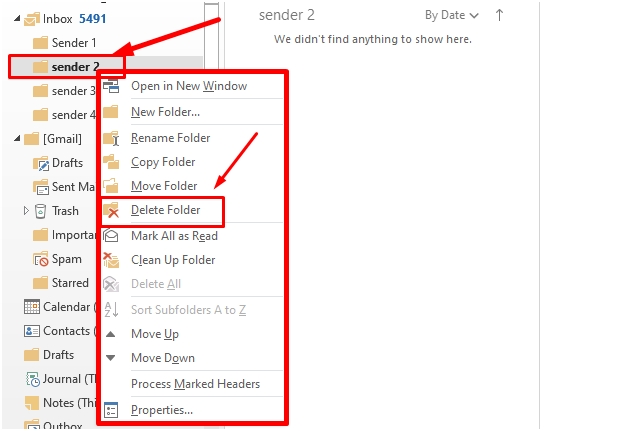
- Now select “Delete Folder”. That’s simple it is. The folder will be deleted and if you want, you can restore the deleted folder from the Trash box in the menu.
Dear visitor, thank you very much for your patience. I have tried my best to show you step-by-step how to organize your inbox with folders and categories in MS Outlook. I hope now you can use your folders more effectively and dynamically by setting categories to them. If this tutorial content seems helpful to you, you can stay with us for more exploration with MS Outlook. In case if you have any queries, please let us know in the comment section below. We will reach you as soon as possible.
Outlook.com is a second website of ready2reading.com


0 Comments