How to Simplify Common Actions in Outlook
October 20, 2024

There are some common tasks in MS Outlook. But often it becomes hard to find the desired feature in time. So our valuable times gets wasted. You might be wondering that, if I could keep all my common settings at the front part of my MS Outlook window, it would have been great. Don’t worry, dear visitor. A powerful feature is designed to automate and streamline the common tasks of Outlook. Yes, I am talking about the Quick Steps in MS Outlook.
It helps users save their time and effort. It simplifies the common actions. This feature allows you to perform multiple actions on an email in a single mouse click. Today, we will dive into the step-by-step guidelines on How to use the Quick Steps in MS Outlook. Alright, let’s kick things off and get started!
How to Recover Deleted Items in Outlook?
How do access and use the Quick Steps in MS Outlook?
This is very easy and you can do it with only one mouse click.
- First, Open Outlook and go to the Home
- Find the Quick Steps group. You will get it in the middle of the Outlook ribbon. In the Quick Steps group, you will see a few pre-built Quick Steps like Move to, Reply & Delete, To Manager, Team Email, and so on.

- Now if you want to use the quick steps group to perform any pre-set actions instantly, you can do it just by clicking on your desired action.
- To use it, simply select an email (or multiple emails), and then click on your new Quick Step in the toolbar. All the actions you’ve set up will be performed instantly on the selected email(s).
- If you assign a keyboard shortcut, you can use that key combination to perform the Quick Step without even clicking.
How do create a custom Quick Step in Outlook?
Now if you want to customize the quick steps menu and want to add new options there, you can also do it very easily.
- To customize or create your Quick Steps, click the small arrow at the bottom right of the Quick Steps group.

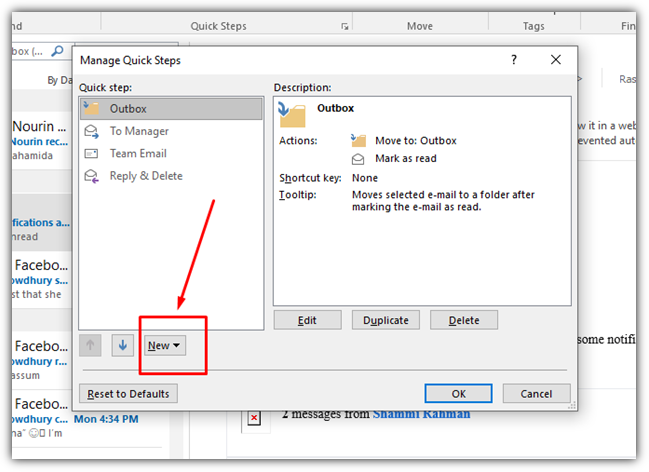
- This will open the Quick Steps Manager, where you can view, create, and edit your Quick Steps.
- In the Quick Steps manager, click on the button labeled New. This will present you with a list of templates for common tasks.

- Now, Outlook will provide templates to help you create a Quick Step based on common tasks. For example: Move to Folder: Move emails to a specific folder automatically. Flag and Move: Flag the email for follow-up and move it to a folder in one action. Forward: Automatically forward the email to a designated person.

- If the pre-defined options do not match your intended action, select Custom from the list. This gives you complete freedom to define the action steps from scratch. You can choose whatever you want.
- After selecting a template or creating a custom Quick Step, you’ll be prompted to enter a name. In the Name field, type in a descriptive and recognizable name for your Quick Step. For example, if you want to create a Quick Step that moves emails to a “Work” folder and marks them as read, you could name it “Work Folder Move”.
- The name is important because it helps you quickly identify and select the right Quick-Step later. A clear, descriptive name ensures that you remember its function.
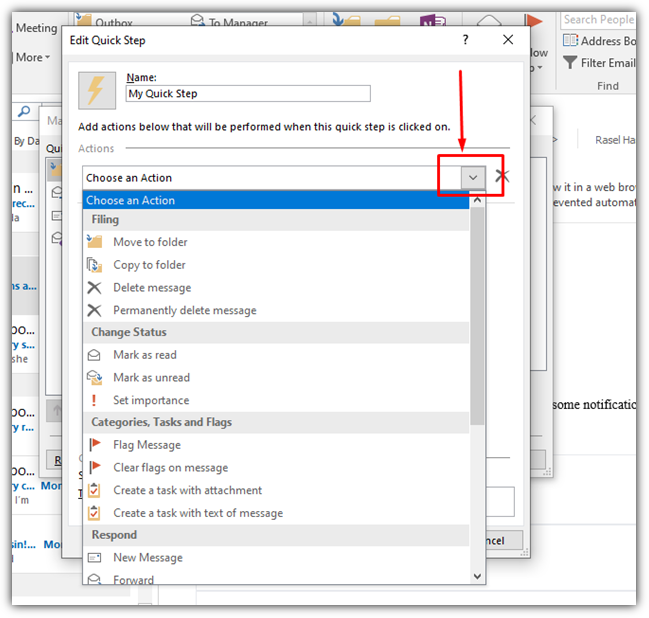
- After you’ve named your Quick Step, it’s time to set up the specific actions you want Outlook to take.

- In the Actions dropdown menu, you’ll find a bunch of options for what you want to happen when this Quick Step is activated.
Here are some common actions that you can add to the Quick Steps group:
- Move to Folder: Select this if you want emails to be automatically moved to a specific folder (e.g., “Inbox/Work”).
- Categorize: You can assign a specific category (e.g., “Important,” “Follow-up”) to the emails.
- Mark as Read: Automatically mark emails as read after performing another action, like moving them.
- Reply, Forward, or Delete: You can automate replying to, forwarding, or deleting messages.
How to Add Multiple Actions
To add more than one action, click on the Add Action button. This allows you to chain multiple actions together. For example:
- Action 1: Move the email to the “Work” folder.
- Action 2: Mark the email as “Read.”
- Action 3: Assign a specific category, like “Completed.” This allows you to complete several tasks with a single click.

How to assign a shortcut Key and Tooltip Text for Quick Steps in MS Outlook?
If you want to make your Quick Steps even faster, then you can add some shortcut keys for your particular actions. It will help you to directly open a setting just with some keyboard shortcut press. This step is optional but can be very useful for frequently used actions.
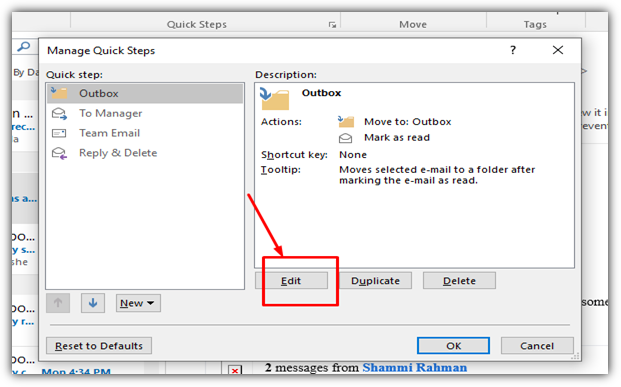
- To add a shortcut key to any action, you have to select the target quick step first. Then click on Edit to open the edit quick step dialogue box.

- Now In the Shortcut key field, select from pre-defined shortcuts (like Ctrl + Shift + 1) to assign the Quick Step to a specific key combination.
- Example: Assigning Ctrl + Shift + 2 might allow you to automatically move emails to your work folder, categorize them, and mark them as read just by pressing this key combination.

You can enter a brief description of what the Quick Step does in the Tooltip text field. This is optional, but it can serve as a useful reminder when you hover over the Quick Step in the Quick Steps toolbar.
Example: If your Quick-Step moves emails to a “Work” folder and marks them as read, you could write, “Move emails to the Work folder and mark them as read.”

After configuring all the actions, click Finish to save your Quick Step.
This is all about the Quick Steps feature of MS Outlook. Creating a custom Quick Step in Microsoft Outlook is a powerful way to streamline your email management system. It will automate the repetitive tasks while using Outlook. Thus, you can significantly reduce the time spent organizing your inbox. I hope you have a clear idea now about the Quick Steps in MS Outlook. With just a few clicks, you can set up actions that match your workflow and help you stay organized and efficient. Nevertheless, if you face any problems while setting up your Quick Steps, you can let us know by commenting below. Thank you.


0 Comments